I have an upcoming customer chest of drawers project. It will be a mid century inspired design and will have a steel base and a steel top and handmade steel drawer pulls.
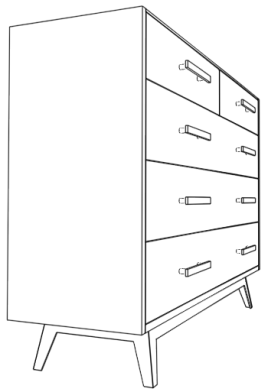
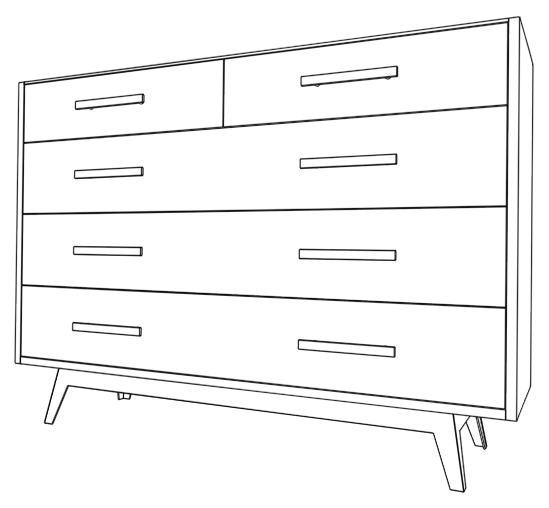
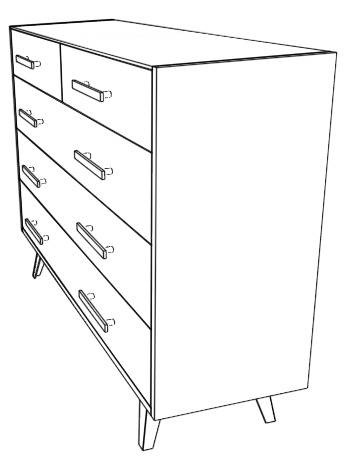
I have an upcoming customer chest of drawers project. It will be a mid century inspired design and will have a steel base and a steel top and handmade steel drawer pulls.
This table was a bit of an experiment but I love how it turned out. The concept was simple, 1/4″ thick steel plate with thin steel legs welded directly to the table top. I like the look, it is very minimal. The table weighs around 96 pounds and is a bit of a beast to move around but is very sturdy.
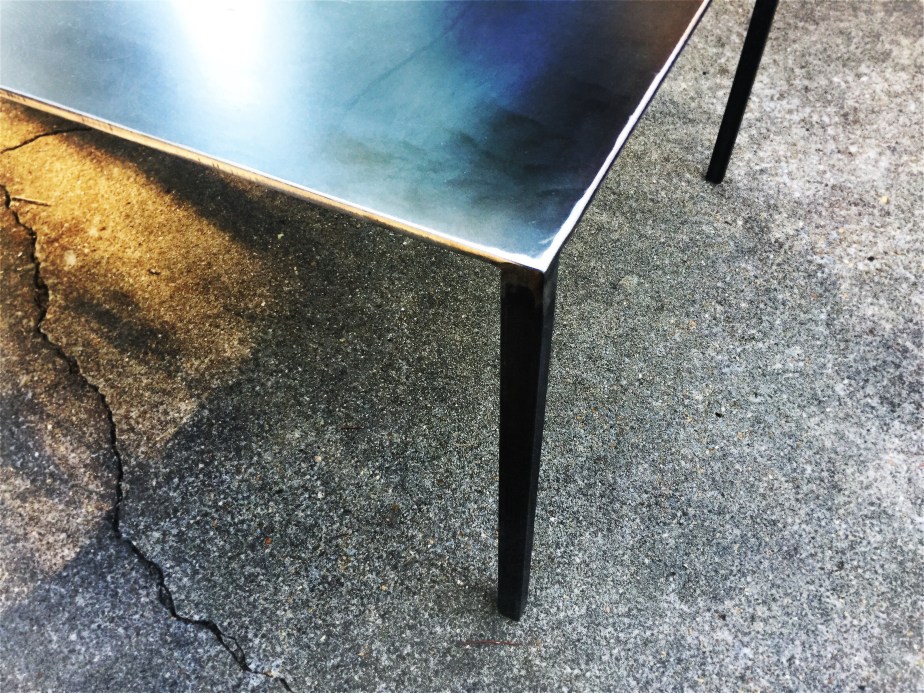
There is still a bit of an iridescent discoloration from the plasma cutter that the steel supply shop used to cut the plate into manageable sections. In the future I would like to make a set of matching end tables to match this.
Just wanted to show off a simple bench made from 1″ steel tube and some very worn and beat up 2″x 8″ lumber. The wood is simple fir construction grade lumber pulled from a garage somewhere after being used as shelving or something for who knows how long. It was filthy but had character and a few live edges so after a bit of sanding and some tung oil it retains it’s rustic look but wont stain or snag your clothes when you sit on it.

The frame is simple and minimal 1″ square tube box legs welded to full length rails with a nicely place know in the planks allowing an interesting view of the steel.
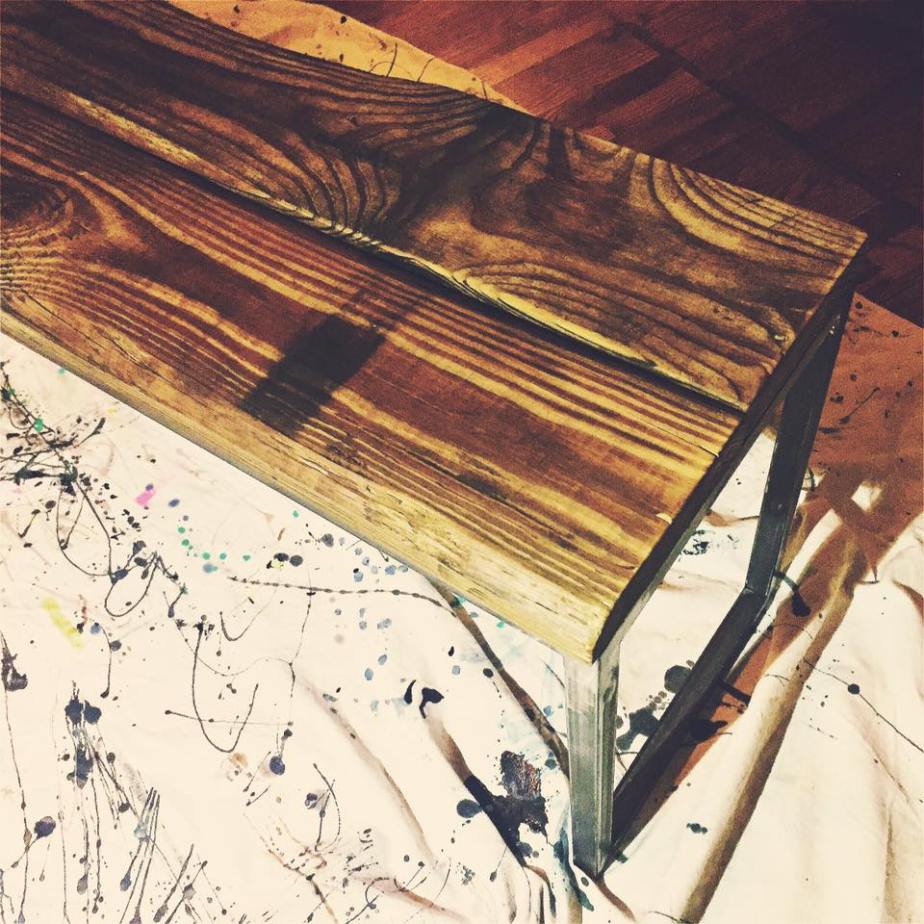
So awhile ago I posted a video showing me building a steel base for a coffee table. I never made the second half of the video because I never made the second half of the video. I did however, finish the table. It took me longer than expected, but in the end, I think the finished product turned out fantastic and am pretty proud of it.
That being said there were a lot of things I learned as I made the table. I learned all about cold blacking solutions and drive screws. I learned how much work it is to add riveted gussets. I learned how expensive old school wire infused security glass can be. And I learned that while it is intimidating to cut up a large beautiful slab of wood, a single person can do it easily with just a normal old circular saw and hand saw.

The gussets took a lot of time but were not all that hard to do. I cut 11 gauge steel sheets into squares using a plasma torch, cut off one of the corners on each one and drilled 5 holes in each on the drill press. Then I clamped the gussets in place on the table base, drilled the specified sized hole and hammered the rivets through the gusset into the table base. That simple, now drill another 99 holes, burn up and break a few drill bits, wear out the motor in your cheap cordless drill, and don’t lose a single rivet because you only ordered exactly enough to finish the job and you’re done. The table was then sprayed with a matte finish aerosol polyurethane to prevent corrosion.
 The slab portion of the top is made of a beautifully colored slab of Beetle Kill Pine I picked up at Hobby Hardwood just outside of Huntsville. It was the first time I had ever worked with a piece of wood like this and I was pretty intimidated. I decided to cut the slab roughly in half and cut one of the live edges off and join the two pieces to create a roughly 34″ by 44″ table top. I decided just to use a piece of steel tubing as a straight edge to drag my circular saw along cutting most of the way through the slab and then finish the cut with a small hand saw. A little hand planing and sanding and the the top was biscuit joined together and glued. The results almost look book matched.

If you look closely you can also get a glimpse at the shelving along the bottom. The center shelf is made from a single piece of 3/16″ plate steel with 1/4″ wired security glass plates on either side. I’m looking forward to doing more projects with that type of glass in the future.
All in all I think the table turned out great and I learned a lot in the process of making it.
So I threw down the ol’ credit card on an X-Carve.
The X-Carve is a CNC router produced by Inventables. It is offered in a variety of sizes starting at 500mm x 500mm up to 1000mm x 1000mm and beyond if you wanna indulge in some modifications. I sprung for the meter by meter machine. The common thread among all the sizes is that you have to build it yourself.
I’m not too concerned. I used to build airplanes and helicopters and I have some experience building largish “making bots” from building, along with a few co-workers, an Re:3D Gigabot last year for the office.
Downside is I will not receive all of the parts at the same time, as the controller and a few other things are back-ordered because you filthy animals overwhelmed the folks at Inventables during everyone’s favorite holiday; Black Friday.
The version I ordered was just updated back in September and includes standard an improved motor controller and replaces the basic DC spindle with a Dewalt 611 compact router along with a long list of other improvements in the stability of the system as a whole. It seems Inventables has taken note of much of the feedback on their earlier incarnation of the X-Carve and made the improvements standard.
So I sat down Wednesday night and started building what I have received. I worked until my GoPro ran out of space recording the time lapse footage. So far I have not lost any pieces. I did receive a pulley with no set screws and will have to order those from Amazon. I stopped about two-thirds of the way through the build due running out of space on my GoPro, only needing to attach the fully-assembled rails to the frame and wasteboard. I finished building the machine a day or so later, minus the backordered components.
So every once in a while I would like to spotlight an artist I think deserves some recognition. The first of which is Eugenia Loli who creates whimsical and surreal collages.
“Eugenia Loli originated in the technology sector, but she left that impersonal world behind in order to build new, exciting worlds via her art. Her collages, with the help of the title, often include a teasing, visual narrative, as if they’re a still frame of a surreal movie. The viewers are invited to make up the movie’s plot in their mind.”
– Eugenia Loli, Artist Statement
Born in Greece, Loli spent time living in several European countries before settling in California where she currently resides. She has had her work published in over 50 publications, more than 25 book covers, and has displayed her art in shows from New York to San Francisco.
Here are some of my favorite pieces.


To see more of Eugenia’s artwork or purchase prints of your favorite pieces, check out these links.
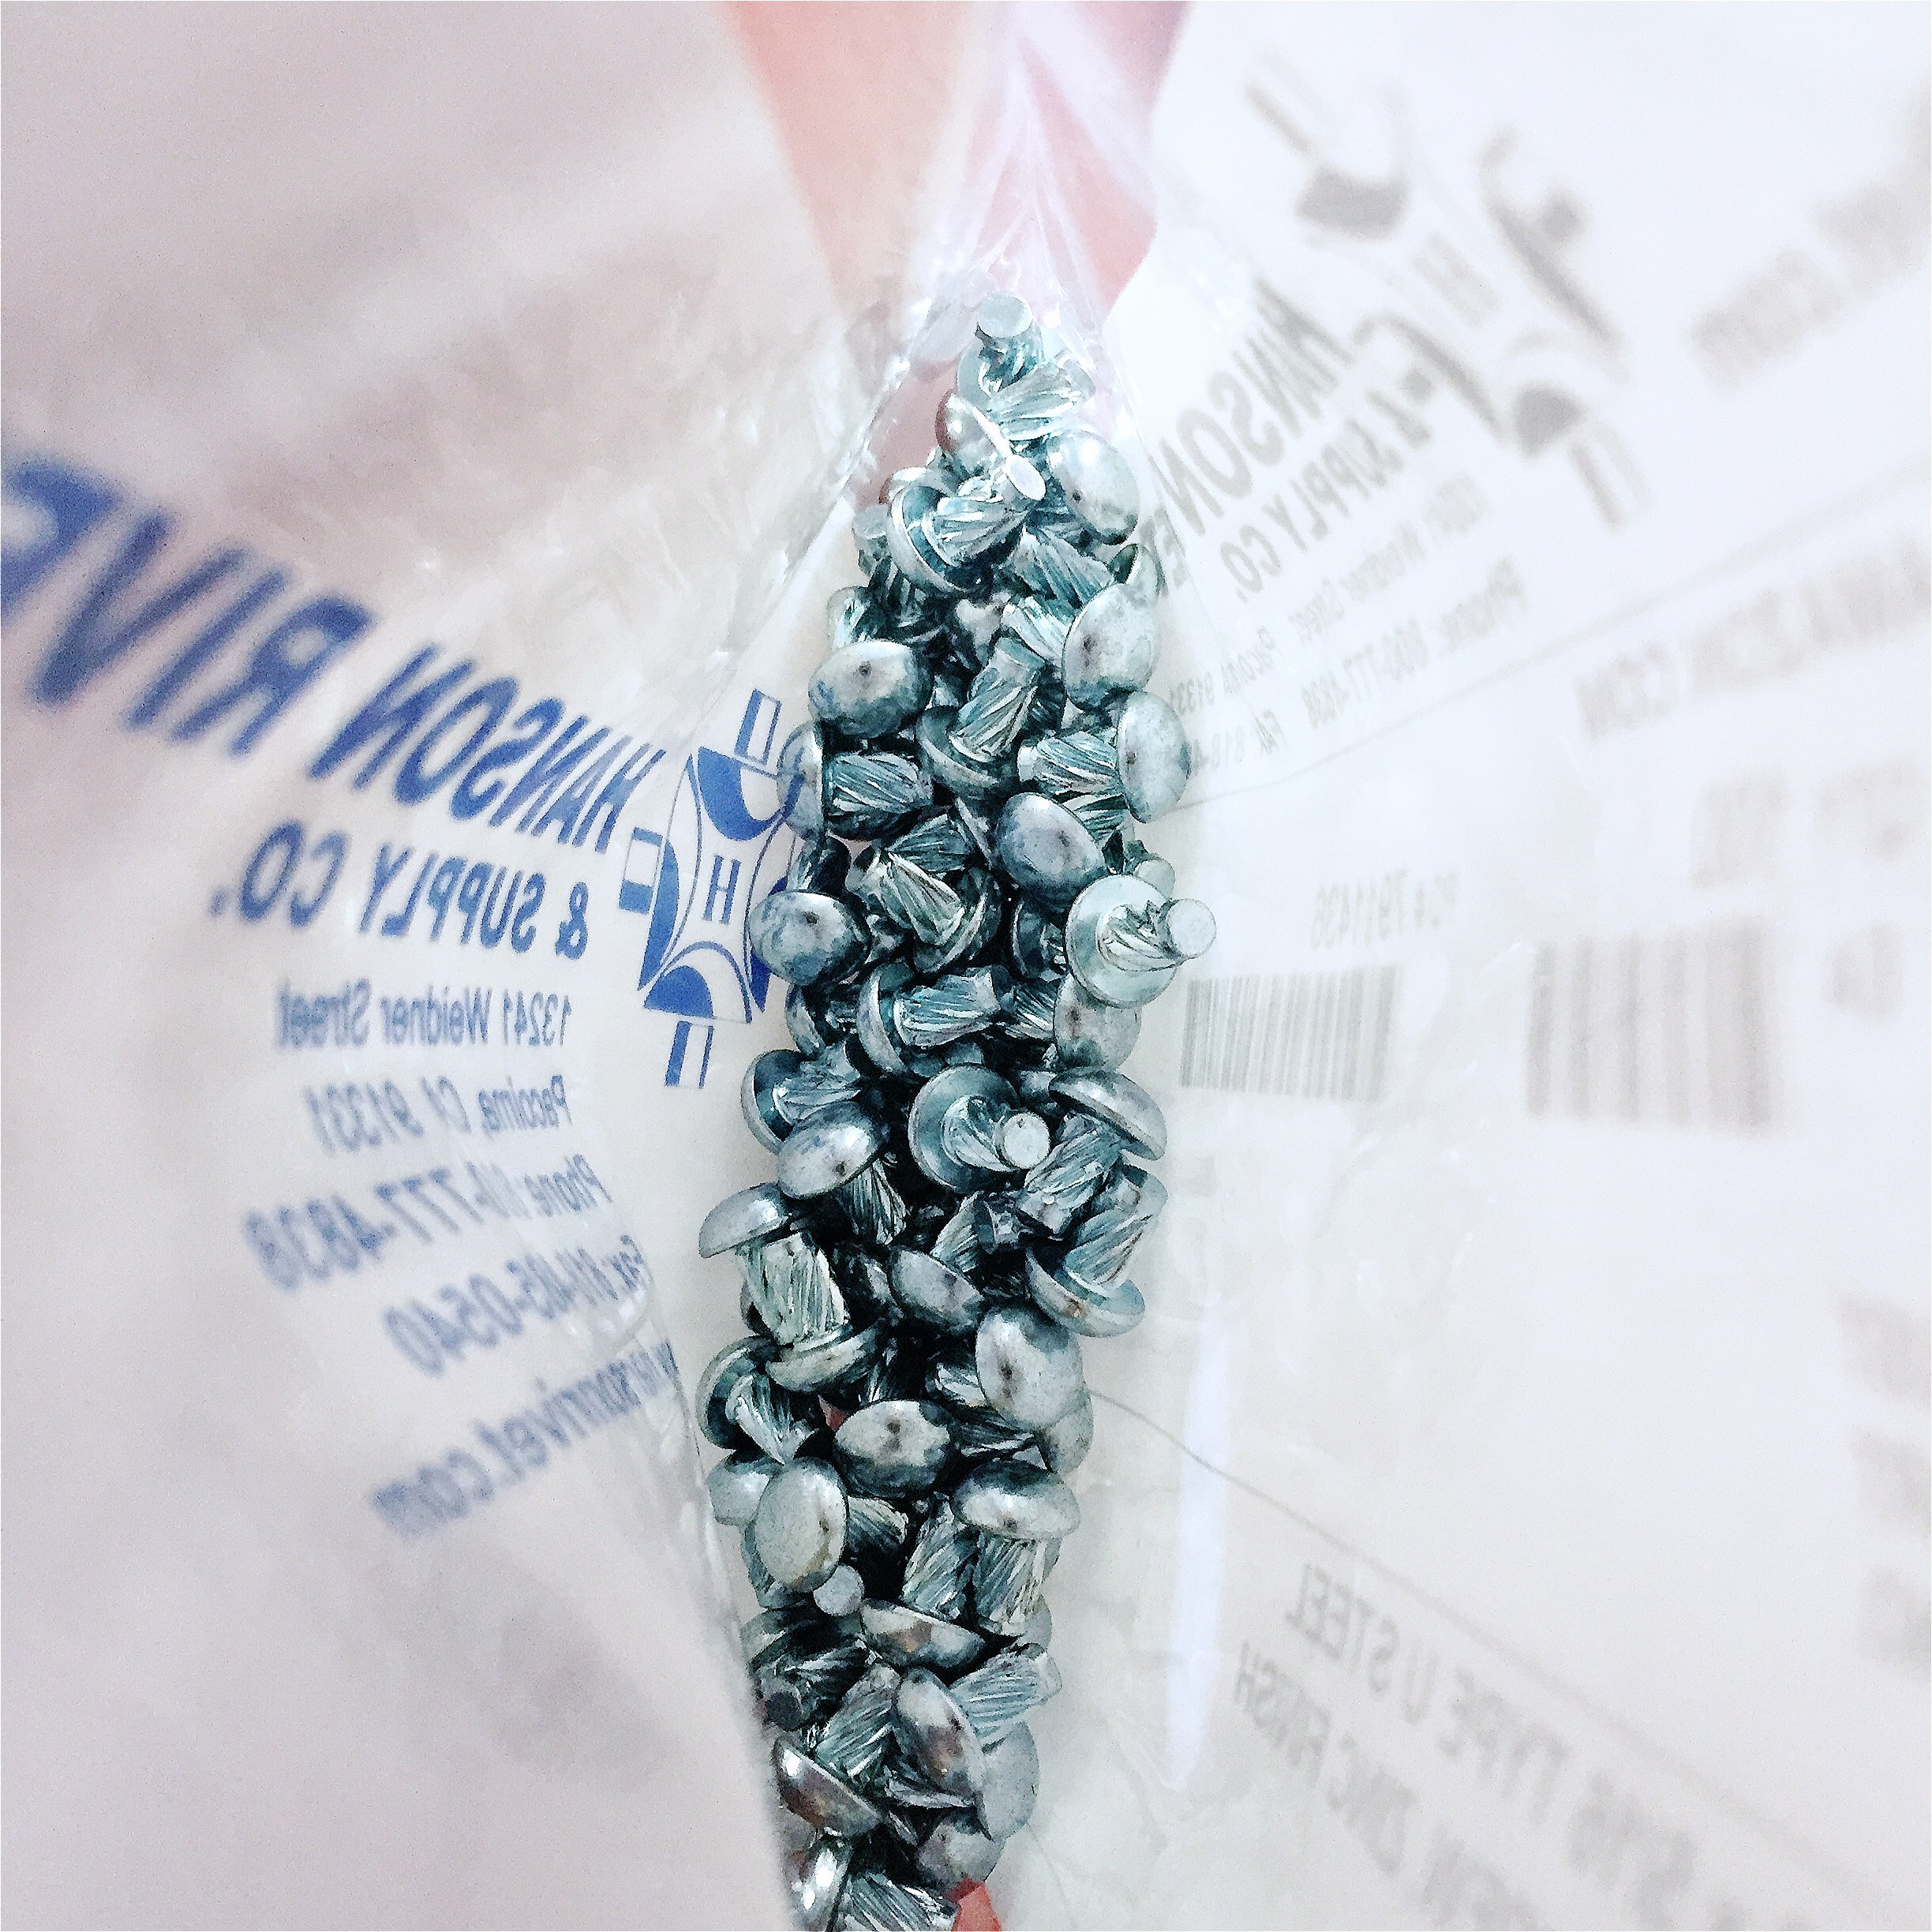
Recently, while working on a table, I needed some drive screws. Drive screws are actually rivets that have a loose spiral threading allowing them to be tapped in blind with a hammer. They can be difficult to source sometimes, but I eventually found some and ordered two bags, each of a different size rivet. The problem happened when I realized I had only ordered bright zinc plated rivets.
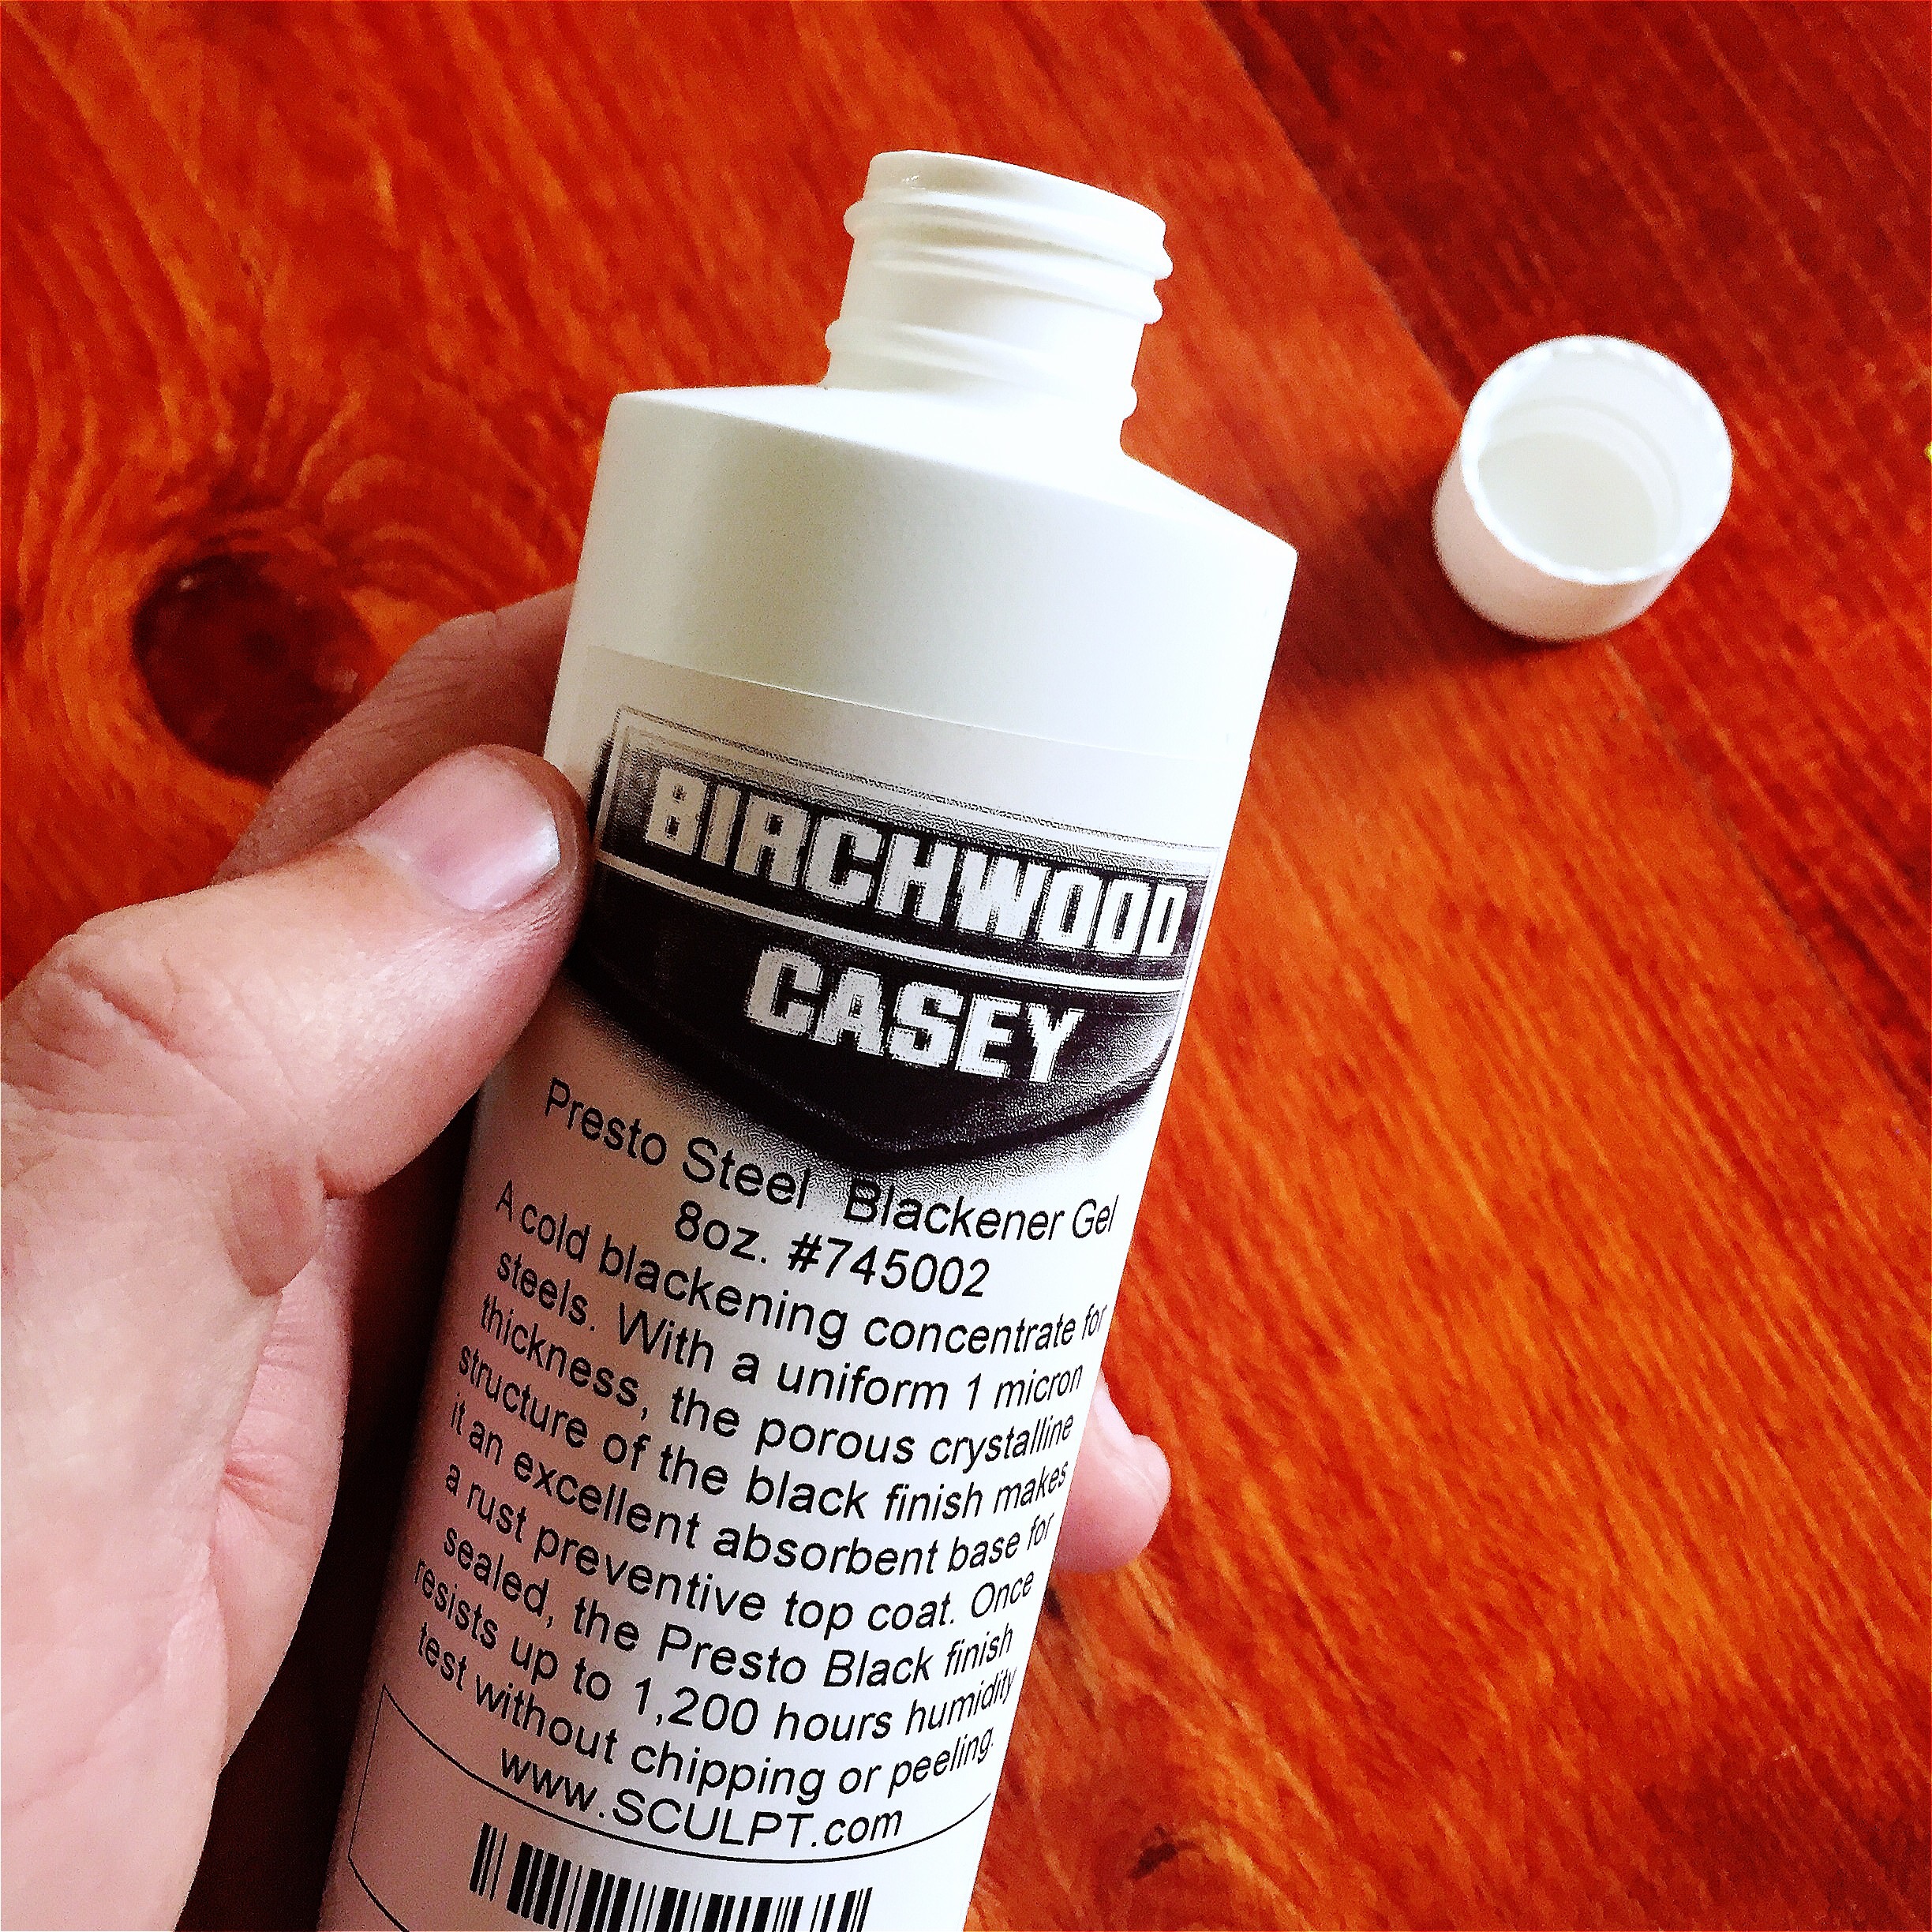
I love the look of raw unpainted steel. It’s subtle coloring variation is hard to mimic with paint. Well worn steel is especially nice, its red rust giving way to a natural black oxide coating in turn giving way to the shine of freshly ground and polished edges and joints. It is this coloration I try to preserve in my work. Zinc plating is pretty much the opposite as while it serves a purpose in corrosion prevention, that is not what I am looking for at this time.
So the solution is cold blacking. And it worked great. I used Birchwood Casey brand Presto Blackener gel.
Here is the process. I actually remembered to take photos as I went too.
I figured the bag the rivets came in would serve perfectly well as a marinade container.

I used maybe a cap full and it was probably still too much. The reaction is fast. You can actually watch the color transition. I sealed the bag and shook it around, mixing the gel around the hundred or so rivets in the bag. After maybe 60 seconds, they looked well blackened.

As I said before I probably used too much. Luckily I had a second bag of smaller drive screws and my OCD is not strong enough to prevent me from mixing the two sizes to make use of the extra gel.

Didn’t spill a single river while pour the second bag into the first and using my other hand to take the photos.

This shows the great difference in color between the blackened and the zinc. Keep in mind this is a chemical reaction and not a paint. The thickness of the coating is measured in single digit microns, meaning it is essentially on dimensional.

After mixing in the second bag of drive screws and mixing everything well. I flushed the bag with tap water to stop the reaction and remove any risidual gel before I laid them out on a red shop rag to air dry.
Recently I finished work on two paintings, both of which have been in a state of incompletion for quite awhile.
I started one of them over a decade ago. I can’t remember whether it was when living in a tiny apartment in Fort Walton Beach, Florida in 2004 or in my first home 20 miles away in Crestview a year or two later. At the time I was painting lowbrow paintings of tattoo flash using acrylics. While I had had mild success at beach galleries a few years earlier selling Banksy-esque stencil graffitied canvas, there were not very many buyers. There were no buyers.
The canvas was stuffed in a closet for almost a decade only to be revisited years later and after moving about five times.
After moving into an old rental home in the Huntsville’s medical district the canvas became a testbed for drip painting using all the old rotten nasty house paint remnants I found in the garage.
Drip painting is something I never expected to love. It looks random but isn’t, but at the same time you don’t have the control you think you do. In that sense it reminds me of the way life gives you just enough control while still being incredibly random.
This drip painting experiment seemed like just that for a few months. Until I finished another long living piece of art.
Back in 2010, I started painting some more abstract pieces than I had in the past. I made two canvasses, they were sort of rearrangeable, meaning you could hang them in various arrangements and certain lines would still line up and colors match etc. it was a pretty horrible execution of a bad idea. The canvasses went in a closet and eventually the canvasses were used by my daughters for finger painting. They ended up a big thickly painted grey blob.
About a month ago, my daughters were painting and I decided to show my youngest how to drip old house paint. We laid out a drip cloth in the driveway, laid down the old canvas and flung old lumpy, gooey, and poorly mixed paint all over the place and stood the painting up to watch the drips travel various directions. Eventually the canvas was covered. I figured it was junk and smeared the paint using the flat side of the scrap of wood that we were using to fling the paint everywhere.

It was like magic. It took a not interesting and ham-fisted looking drip painting and changed it. It made sense to me. I could see shapes and saw motion in it now. It’s not as large as I would like but it fills a space on the wall next to the TV that used to be occupied by an iteration of the aforementioned drip painting test canvas. I often find myself just staring at it as if my brain is trying desperately to figure out what the painting is about.
That canvas had come down when the new one went up. It sat in the empty fireplace for a few weeks and I would star at it. It was busy and forced looking. The colors were off. I was not a fan.
I tried it again. I squirted whatever black and white paint I could find on it. Not sure if it was acrylic or tempura poster paint, but it was now on the canvas. I then took an scrap stamped wrench and spread the paint across a portion of the canvas and changed the whole feel of the piece.

Abstract art may or may not be your thing, but I think it might be mine.
Shou Sugi Ban 焼杉板 (or Yakisugi) is the Japanese method of preserving wood through carbonization, a chemical reaction otherwise known as “fire” that seals the pores of the wood with carbon. This carbon is then often sealed into the wood using an oil-based sealant.
Traditionally Shou Sugi Ban is used to prepare boards for use as exterior siding on buildings though in the last few years the finishing process has gained popularity as a treatment for interior wood used in furniture and wall facades.
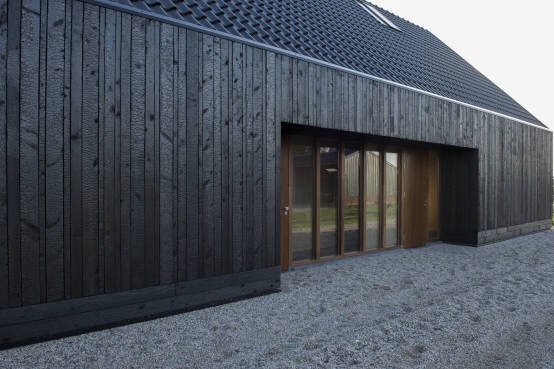
The traditional method often has the craftsman binding two or three long Japanese cedar (Sugi) planks together with a fire lit between the boards. The boards are then stood upright to form a chimney along which the fire progresses until the boards have been evenly charred. More modern methods may replace process this with scorching via a common handheld gas torch. At this point the boards are quenched with water and scrubbed with a stiff bristled brush or broom to removed loose soot and carbon material and left to dry. Finally the planks are sealed with an oil leaving a gorgeous shimmering coal-like appearance.
The benefits of the finish go beyond aesthetics as Shou Sugi Ban offers increased fire resistance, reduces susceptibility to rot, and protects the wood from damaging attacks by insects.
Disclaimer: This is potentially dangerous and can result is serious injury or death. This article is for entertainment purposes only. Do not try this at home. Go somewhere else.
At one point in time or another everyone wants to cut a propane tank in half. The problem is a propane tank is a pressure vessel filled with flammable gas under pressure and even empty bottles still contain some amount of propane and/or flammable chemical residue.
Even though there is a disclaimer at the top of the article stating this is for entertainment purposes only, I would like to reiterate that this is a potentially dangerous task and that any and all safety precautions should be taken.
Get your old propane tank and open the valve. There may be some gas under pressure left in the bottle and we want to relieve any pressure present inside the tank. Let it sit with the valve open for a few minutes.
Remove the valve at the top of the bottle by using the piece of scrap wood and the mallet to lightly tap the side of the valve assembly counter-clockwise to the left. It may take some penetrating oil if the valve is rusted in place. Once the valve is loosened it can be unscrewed and the valve assembly can be removed from the tank.
Now that you have the bottle open and the valve removed you may smell the remnants of propane left in the bottle. Propane is heavier than air and there will be propane present in the bottle even after pressure has been relieved.
Fun Fact: Propane itself is odorless and the smell is added to notify people of the presence of the gas.
So this is a very important step in the process. In order to purge any existing propane from the bottle we are going to fill the bottle with water. This will displace any remaining gas in the tank.
I chose to let the tank sit full of water for a few days before I drained it. This may help to wash away any residue left on the inside of the tank by the propane. you may also choose to only partially drain the tank before cutting it, but will want to drain the water to a level below where you plan to cut the tank.
Now we get to cut. I used my plasma torch to quickly sever the top dome from the tank, though any method of cutting metal should work. Other methods include angle grinders, reciprocating saws, and gas torches.
What you plan to use your tank for will determine what shape you cut in the tank and where in the tank you cut it. I for instance created a very small fire-pit from my tank while I have seen people pack the tanks with fire blankets and to create a small forge or use the tank as a BBQ smoker.
Have fun. Be safe.


